Wednesday, December 30, 2009

My Newly Decorated Cricut Expression Machine


On the Cricut Messageboard I started a discussion about " If you could choose your E (Cricut expression machine) color which would you choose and why" (find the thread here)

I would choose Red - because it's my favorite color and I look good in red :)

It was a great discussion with color ideas to include purple, orange, turquoise, pink & black, champagne and gold. kathyOrta said she would like an "E" with black zebra strips and some bling outlining the strips. Everyone had wonderful ideas for their very own Cricut expressions machine.

"Katyfitz" one of the posters showed a photo of her Cricut machine that she decorated with colored vinyl, it was fabulous!! And "scrappinsista" attached photos of her Cricut that she painted herself, it was red, and she also added skittles (small glass embellishments) all around the edge, and to amaze us even more she painted her cuttlebug to match. This was eye popping!
Another poster "AMZGrace" said... -----------Robin,
You should use your Cricut and cut out some RED vinyl accents or images and personalize it, then you'll have a one-of-a-kind. -------------

Wowza... what a wonderfully crazy idea! So I went to work today designing what I wanted to put on my Cricut.

I love the flourish design that is on the limited edition blue Cricut machine, so I searched for a flourish design that I loved. The design that I found is a brush stroke for Adobe Photoshop found here. I saved the image as a .jpg file then using Inkscape thickened the image just a bit and changed the image to an .svg file. I measured my Cricut machine door so I could get to design the right height which is 5", then cut the image using Sure Cuts A Lot (scal).
(tutorial below)
My newly designed Cricut
My vinyl tutorial from start to finish:

Although my mat was sticky I wanted to make sure the vinyl wouldn't slip while cutting so I added masking tape to the edges before cutting.
I cut the vinyl using my green housing blade set at 6, speed at 3 (med.), pressure 3 (med.). I did not need multiple cuts.
The blue deep cut blade also works, I tested both and found that the green housing works just fine. If using the deep cut blade set at 4, speed at 3, pressure 3.
I cut two of the flourish designs.
After cutting my image using SCAL and my Cricut machine, I carefully remove the outer pieces of the vinyl, because this image is so detailed I cut away at the edges a little at a time so not to get the sticky side of the vinyl stuck on the detailed flourish design.
I then carefully remove any inner vinyl pieces that are not part of my flourish design.
After removing any unneeded vinyl I then place clear transfer tape over my design, I cut excess transfer tape and around the image, then burnish (rub) the image so it will stick to the transfer tape.I turned the image over then slowly and carefully removed the backing from the vinyl, the tricky part was to keep those tiny dots where they belonged.

Now the wonderfully fun part is to place the beautiful design onto my Cricut. I carefully placed my design where I wanted it to be, then rubbed it again. Yes, you guessed it slowly and carefully remove the transfer tape.... beautiful!
With the second flourish design I cut it apart because I only wanted to use portions of the image for the right side of my Cricut machine door. I followed the same steps as above applying the transfer tape, then removing the vinyl backing and placing it into position on my Cricut.
I also used SCAL with the two different fonts for the words.
Before....
After...Now it's your turn.... I challenge you to decorate your Cricut machine. I've started a new post over at the Cricut messageboard click here and show off your newly decorated Cricut. I double dare you. Click here for the post and to see more Cricut designs.

Have a wonderfully creative day!
Robin :)

Tuesday, December 29, 2009

Wild Card #11

The swoop card found on page 42 of the Wild Card booklet.
A very fun card to make, I love the curved edge on the card, it makes for a unique style.

Below is a photo of the pieces that I cut for my card. There are 9 pieces, everything is cut at 4" except the two flowers they were cut at 6"
The white paper is the blackout image that is place on the inside of the card.
So much fun!

Have a wonderfully creative day!
Robin :)

Monday, December 28, 2009

Wild Card #10

Another fun Wild Card here, #10 can be found on page41 of the Wild Card booklet.
I love how this card turned out and the colors were so cheery. Each piece was cut at 6", a big card but I love it. I cut 11 pieces for this card, for the liner with the triangle cut out, I used the triangle and did not discard it.

More "Wild Cards" to come, keep watching my blog.

Have a wonderfully creative day!
Robin :)

Sunday, December 27, 2009

Just Buggin' Challenge #17

Challenge #16 -Inky Fingers
This challenge is to use ink to alter your die cuts.

One of my favorite inking techniques is to use the Cuttlebug embossing folders then gently rub an ink pad over the embossed die cut, it makes the image look great.
The vase and shadow were cut at 1 1/4" from the "Walk in my Garden" Cricut cartridge pg. 102 I then embossed using the "Textile Texture" embossing folder. Flowers from pgs. 1 and 6 in various sizes ranging from 3/4" to 1 1/2" then embossed using the "Swiss Dots" embossing folder. I inked all die cuts over t he embossed image and the edges.


Just Buggin' has weekly challenges to inspire us to use our Cricut machines, come join the fun!

Have a wonderfully creative day!
Robin :)

Friday, December 25, 2009

Cricut Cookie

Merry Christmas to my wonderful blog friends.

My family and I decorated cookies today and I just couldn't resist to make a "Cricut Bug" cookie best wishes to you and your families.

Cricut Bug Bell
Have a wonderfully blessed day!
Robin :)

Wednesday, December 23, 2009

Wild Card #9

A super cute and uniquely shaped card, I love the flowers.
This card was cut from the "Wild Card" Cricut cartridge, the pieces I cut out can be found on page 40 in the wild card booklet.

I cut each piece out at 5 1/2", The card and envelope were cut out using the blackout feature. Here is a photo of the pieces I used to make this card.
I only wanted to use one of the flowers cut from the icon feature on the front of my card, so I cut the daisy shaped flower from the other two.I brushed the edges of the daisy with ink and added a sparkly brad in the center. Since I used double sided pattern for the envelope I chose not to add a liner and I love the soft look is has.

If you have any questions let me know.

Have a wonderfully creative day!
Robin :)

Tuesday, December 22, 2009

Wild Card #8

This oval card was fun to make, I love the swirls layer and the festive look it has from the colors that I chose.
The pieces I cut are from the "Wild Card" Cricut cartridge found on page 39 of the booklet.
All pieces are cut at 5 3/4"
I adhered the green oval liner to the white swirl oval card, then cut off the left side as shown below then discarded it. The swirl frame was then glued to the oval red card, then I added the light green liner to the envelope, a super easy card.
Wild Card #8
If you have any questions just post in the comments area.

Have a wonderfully creative day!
Robin :)

Monday, December 21, 2009

Wild Card #7

If you all thought I had completely forgot about the Wild Card series that I'm doing, I wanted to let you know I didn't forget, I just had it on the back burner... so now it's time to get it going again.
Here is card #7 using the "Wild Card" Cricut cartridge pg. 38

I cut everything pictured below at 5", except the 4 little squares, which I cut with my paper trimmer at 1." I used double sided pattern paper and 2 of the squares are flipped over to show the opposite side of the pattern. I'll show you what I used these for below.
Here is the inside of the tri-fold booklet, I used the 4 squares in the corners as shown below, so the dark green pattern paper would show through the little leaf holes on the left, the two squares on the right are there just to give a pleasing look and balance to the project (leaves are not cut out on the right side). I added pop-dots behind the tree. I used a black gel pen with a holder in my Cricut machine to draw the words "you are special", then cut it into a rectangle shape and glued it behind the frame and used pop-dots to lift the frame off the front of the card.
I used double sided pattern paper for the envelope and I like how it turned out.
This photo shows the pattern paper squares behind the leaf cut outs.

Wild Card #7
Have a wonderfully creative day!
Robin :)

Sunday, December 20, 2009

Just Buggin' Challenge #16

Just Buggin' challenge #16 -Santa's Helper --Make a gift for someone you love
Come join me in this challenge over at Just Buggin'

This project that I made is very simple, easy to make in just a few hours, and makes a beautiful gift. This frame is for a very special friend.

Photo frames can be purchased very inexpensively. I got this frame at Wal-Mart for $3 it had a mat for two 3" x 5" photos, I just removed the mat to make my project.

I used Cricut cartridge Storybook for the "Peace" lettering in a dark red, then used the "textile" embossing folder with my Cuttlebug machine. One of my favorite tips is to gently rub the embossed letter with ink, it just makes the embossing pop even more. I placed the red lettering on a black using the shadow feature for the letter.
I used my SCAL for the "be unto you" the font I used is Shelley Volante. I cut the letters on black vinyl and placed it on the outside of the glass frame. If you have any questions just let me know here in the comments.

Just Buggin' has weekly challenges to inspire us to use our Cricut machines, come join the fun!

Have a wonderfully creative day!
Robin :)

Saturday, December 19, 2009

Cockatoo Flip Calendar

I made a super fun flip calendar that could be used year after year. I got the idea from simplyinked- on Splitcoast Stampers.
I started with a piece of heavy cardboard, and covered with designer paper. Each day, month and date was printed using my computer then attached to a strip of green cardstock. I used the Zutter Bind it All for the binding.
For the background behind the cockatoo I used the Cuttlebug embossing folder "Swiss Dots." The bird and branch was cut from the "Storybook" Cricut Cartridge, I extended the branch with a strip of brown cardstock to give a longer perch for the bird. I brushed the edges of the leaves with two different colors of ink on each side.

Have a wonderfully creative day!
Robin :)

Wednesday, December 16, 2009

Sweet -Baby Card

Today I made a sweet and simple baby card using the "New Arrival" Cricut cartridge.

For the bootie and the word I used Stampin' Up shimmery cardstock, I love how it looks. For the word "sweet" pg. 123 I traced useing a gel pen in my cricut expressions machine, I'll show you on another post how I did that.
The bootie is on pg. 107 since there were already slits I added light blue organdy ribbon I liked to look it gave.Have a wonderfully creative day!
Robin :)

Monday, December 14, 2009

Just Buggin' Challenge #15

Challenge #15 -Happy Holidays
Make a winter or holiday or Christmas themed project.

I went with a winter project, a gift box full of cards.
The cards can be used a winter thank you, or added to a gift or holiday treat.

Happy Holidays Gift Box

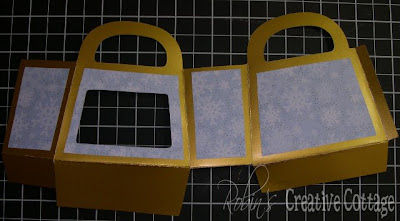
I started with Tags Bags Boxes & More cartridge. Pg 115 gift box with window.
I cut two boxes the exact same size 5 1/2" each, using both gold cardstock and a pattern paper. With the pattern paper I cut where the score marks are including the handles. Discard tabs and handles.
Then I eyeballed using my scissors and cut about 1/4" off each side. I keep only the inside, to adhere to the gold box as shown below.
I made 6 cards for the gift. With the extra patterned paper I cut 1" strips to add to the cards. Each gold card measures 2 1/4" x 5" (2 1/4" x 2 1/2" when folded).
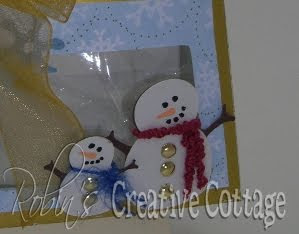
I used the Doodlecharms Cricut cartridge for the cute snowmen sized at 1 1/2" and 1" for the smaller snowman pg. 82. Snowflakes are also from Doodlecharms pg. 83, in various sizes.Just Buggin' has weekly challenges to inspire us to use our Cricut machines, come join the fun!

Have a wonderfully creative day!
Robin :)

Friday, December 11, 2009

Holiday Tags --easy peasy

Simple tags using the Christmas Cheer Cricut cartridge, cut at 3 3/4".
I made these tags to put on the plate of goodies that we'll be taking to neighbors to wish them a Merry Christmas.
My husband is the holiday goody maker, divinity, fudge, and grandma's sugar cookie recipe that we love to decorate. When my family decorates the cookies my husband always kills Rudolf every year by making a frosting arrow on the deer, don't take offense if we didn't have a reindeer he would kill a snowman... it's just a crazy tradition, and if he didn't do it the girls would miss yelling at him... "oh Dad just killed Rudolf.... DAD, oh not again DAD!!!!"
Do you have a silly holiday tradition? Please share.

On to the tag info...
I used the "tag" selection key to cut out the image on the tag, my pattern paper was not cardstock heavy so I cut using these dial sizes: Blade 4, Speed 3, Pressure 3. this is what worked for this paper.
I cut the backing for the tag from pg. 131 of Christmas Cheer.
I added some funky fibers which adds such a fun touch.
Have a wonderful creativity day!
Robin :)

Cleaning My Cutting Mat

Does your cutting mat look like this...... yuck.
A step by step of how I cleaned my cutting mat. None of these ideas are my own, I've combined several ideas I've learned in the Cricut Message board to show you how I got my mat clean and sticky again.I place my mat in warm soapy water
Then I used a scrapper to scape the mat (my scrapper is from Pampered Chef --this tool has multiple uses) I scrapped at all different angles and put this dirty yucky sticky stuff in the garbage. Then scraped some more.
Then rinsed my mat really well.
Pat dry and I let my mat sit for about 1/2 hour or hour, to let the air dry and little spaces. During that time I can fold load of laundry or clean my house, and you thought I created all day... silly.When my mat was good and dry I took a link roller and got some of the sticky little blobs that were left on the mat, I rubbed with my hand to feel for any sticky spots. I even rolled on the back side, sticky stiff was there too.Now the fun part, making my mat sticky again. I use Zig 2 way glue with the Jumbo Tip on every inch of the cutting area. I start on one side and glide about to the 6" mark and did this all the way down one side of the mat, flipped the mat around and did the other side. Then I set the mat aside and dry for a few hours before I use it... more laundry? or should I clean the house?
Wow... look at my new mat... maybe not new, just refurbished.Do you have other tip of ways you clean Cricut items? Please share.

Have a wonderfully creative day!
Robin :)